EasyBadge Cloud allows users to be able to quickly and easily import records and individual ID photos together into EasyBadge Cloud. This saves users time and aggravation from having to manually upload record after record.
Step 1: Create an Excel spreadsheet with records
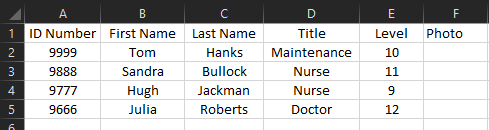
When creating an Excel spreadsheet with your records you will first want to add in the headers. The headers will be named after the fields on your datasets.

Next you will fill out the information under the headers (except the photo header).
Step 2: Uploading bulk photos and creating a photo pathway
1) Place all your photos into a folder. Name the folder something that you will be able to easily identify with the project you are working on.
2) Zip the folder your photos are located in by right clicking on the folder > send to > compressed (zipped) folder.
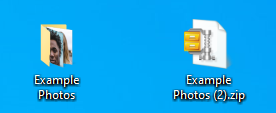
The zipped folder will be the one that you upload into EasyBadge Cloud.
3) You will need to create a photo pathway in your Excel file in order for EasyBadge Cloud to know where to pull the photos from. This photo pathway will be located under you photo header.
The photo pathway will need to be Name of the folder/Name of the photo.picture format. For Example: NameOfFolder/NameOfPhoto.jpg. The photo pathway is case sensitive. Do not add the zipped folder name in the folder pathway.

Step 3: Save your Excel spreadsheet as a .csv file
In order to import your data into EasyBadge Cloud, your Excel spreadsheet must be saved as .csv file. This is just one of the many options of file format available within the Microsoft Excel application.
Within your Excel file, go to File > Save As > [enter the name you’d like to call this file]. Once you enter your filename, you can save it to a .csv file by selecting the “Save as type” drop-down field and choosing the “CSV (Comma delimited)” format option. Then just hit the “Save” button, and your file is now ready to import!
Step 4: Importing your data into EasyBadge Cloud
Click Records > Import/Export & Delete Records > Upload your own data and images. Then select your csv file and the zipped folder you just created. Make sure to select the box that says "Check this box if your CSV contains a header row".

Next you will be brought to Mapping Your Data. Here you will want to double check that the headers on your csv file match the fields in your dataset. Most of these should auto map for you but if you did name your headers something different then what is in your dataset you will have to map it manually by using the dropdowns.

Then you will select the orange Start Import button and your records will now be added into the EasyBadge Cloud system.
Was this article helpful?
That’s Great!
Thank you for your feedback
Sorry! We couldn't be helpful
Thank you for your feedback
Feedback sent
We appreciate your effort and will try to fix the article